
On this page
Images from underwater cameras, microscopes, remotely operated vehicles, and coastal surveys can be used in machine-learning projects. Before a model can learn what is present or where it appears, however, people must add examples of the expected answer. This work is called image annotation.
Label Studio manages the images and annotations, while the Segment Anything Model (SAM) helps create segmentation masks. An underwater-animal image is used as the example, but the same workflow can be applied to marine debris, benthic organisms, plankton images, equipment inspections, and other image-based projects.
The environment is built on Ubuntu with Docker, with SAM running on an NVIDIA GPU.
If you only need manual annotation in Label Studio, complete the Label Studio installation. Continue through the SAM setup if you also want automatic mask suggestions.
What Is Image Annotation?
Image annotation adds information that a model can use as an expected answer. The type of annotation depends on the question being studied.
| Task | Annotation | Example question |
|---|---|---|
| Image classification | One label for the whole image | Does this image contain the target? |
| Object detection | A box and label for each target | Where is the target? |
| Segmentation | A pixel-level region and label | Which pixels belong to the target? |
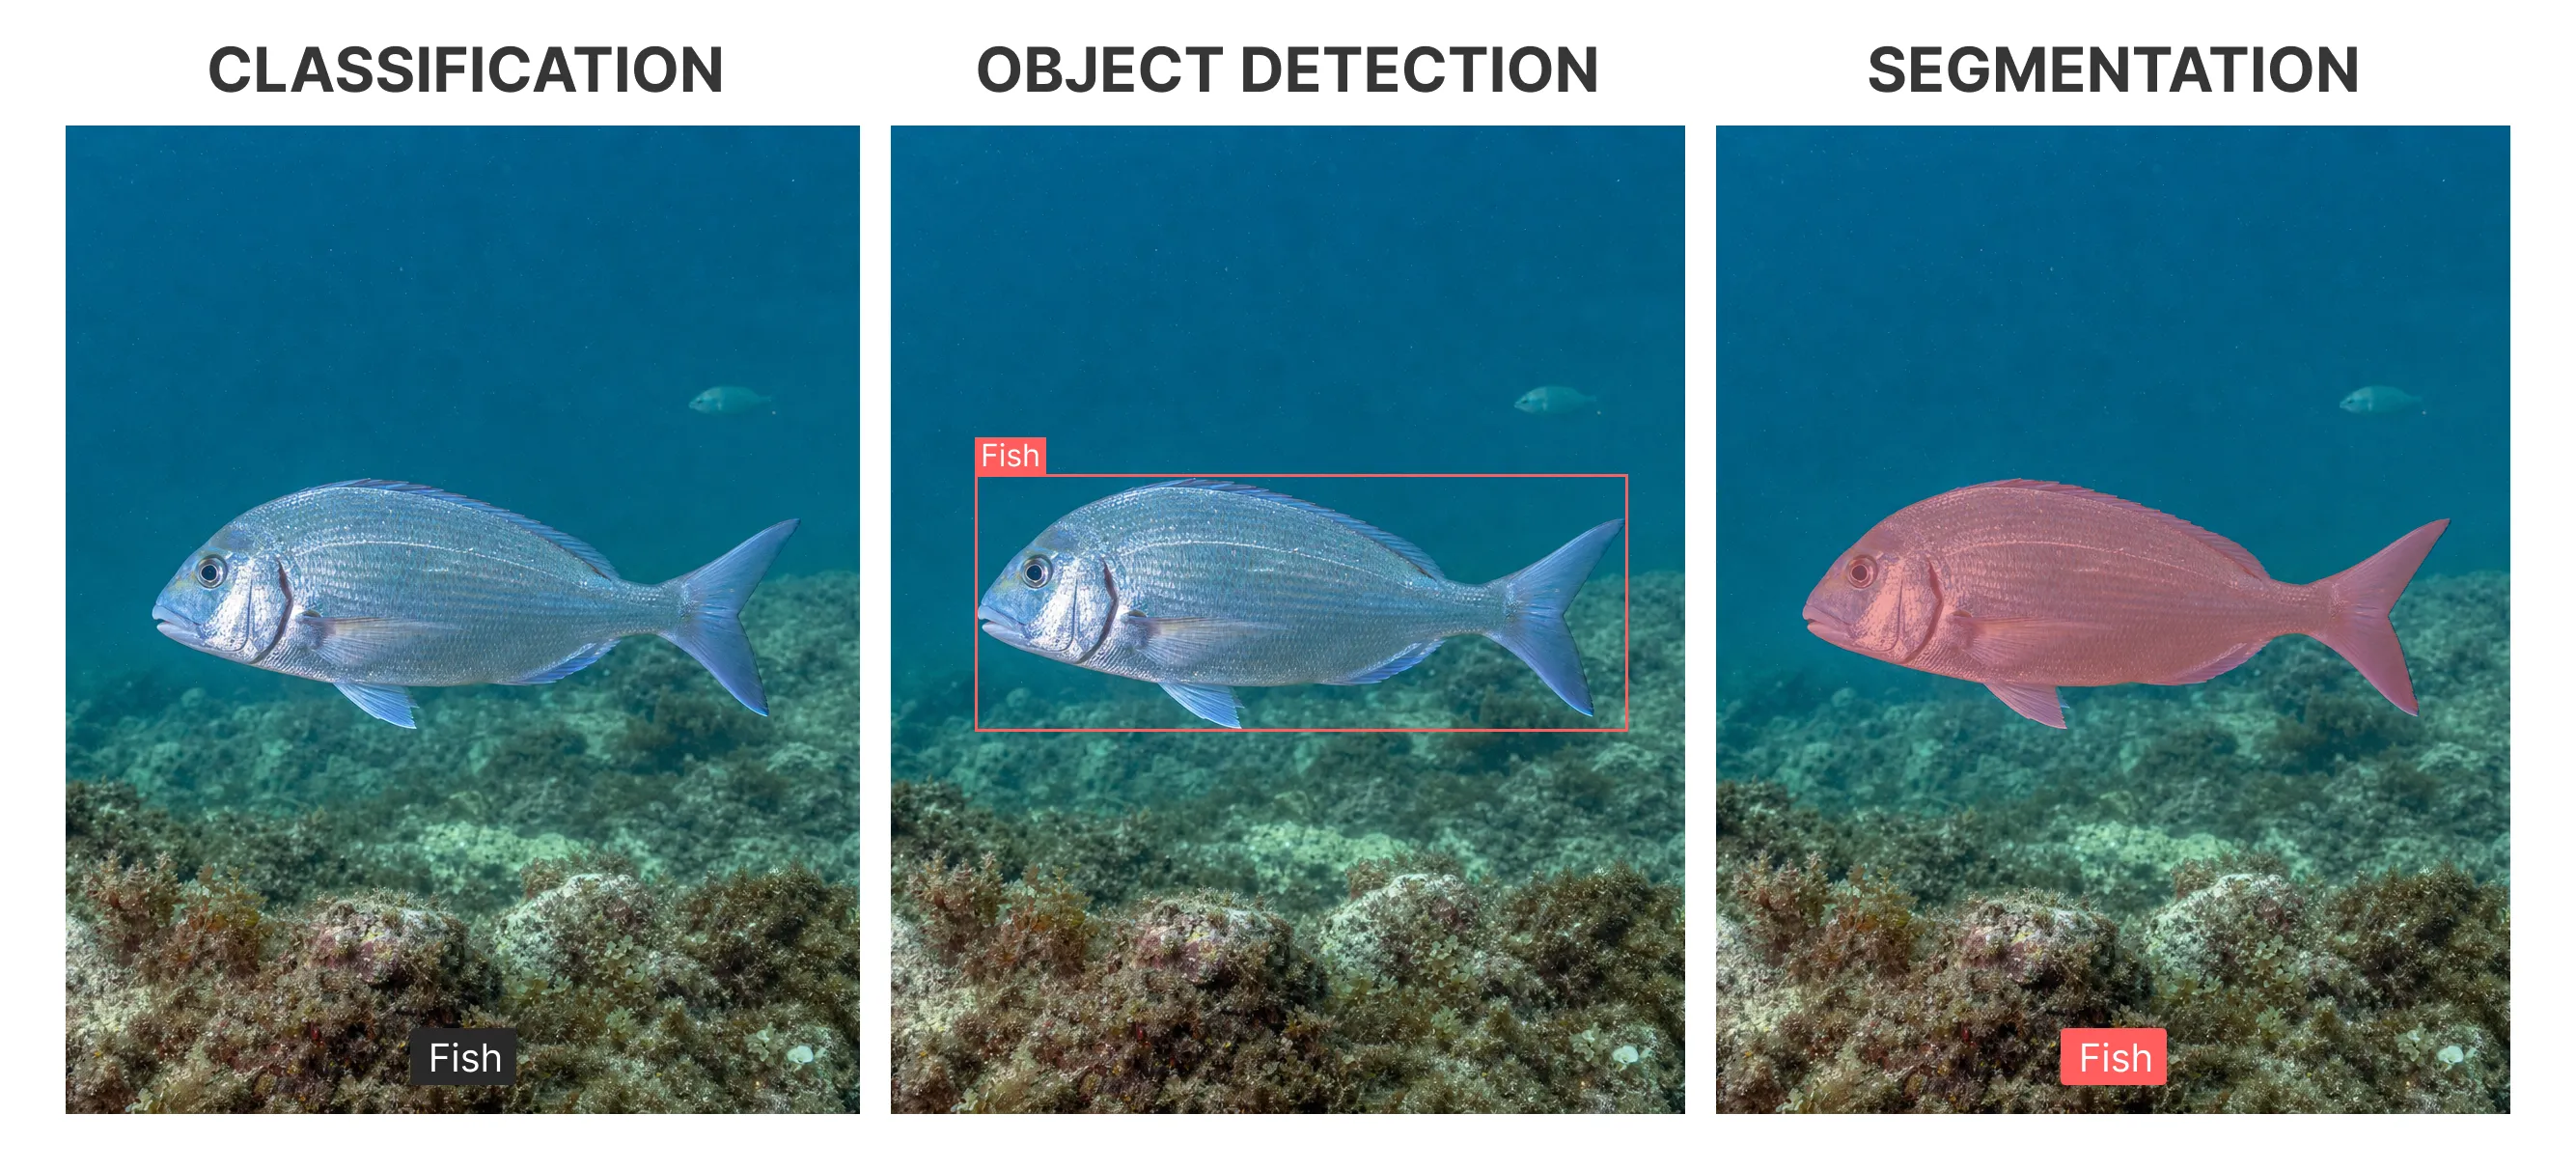
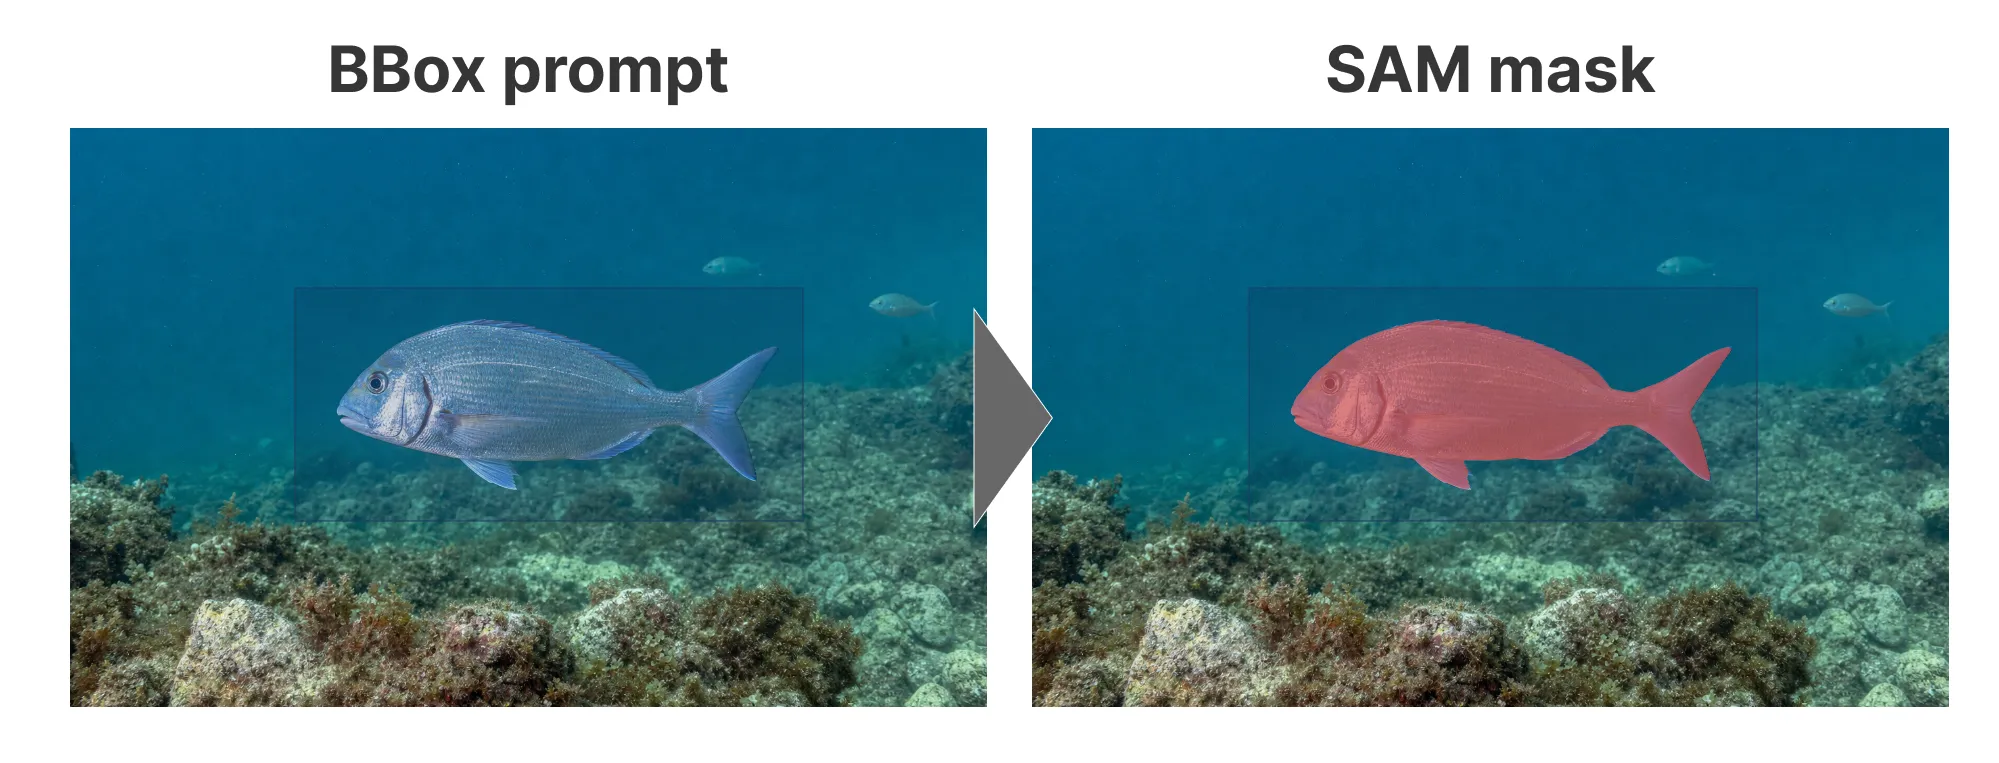
This guide focuses on segmentation: a person selects the Fish label and draws a rough box around one animal, and SAM proposes a mask for the person to review before saving the annotation.
What Do Label Studio and SAM Do?
Label Studio is an open-source annotation platform. It provides the screen for importing images, defining labels, assigning work, reviewing annotations, and exporting results.
Segment Anything Model is a model that can propose an object region from a prompt such as a point or a box. In this setup, Label Studio sends the box to the SAM backend, which runs SAM and returns a mask.
SAM does not decide that an object is a fish or identify its species. A person chooses the label and decides whether the proposed boundary is suitable for the project.
The Workflow Built in This Guide
The completed workflow is simple from the annotator’s perspective:
- Import an image into Label Studio.
- Select a label and draw a box around the target.
- SAM uses the GPU to create a mask proposal.
- Review the mask.
- Save the completed annotation.
Label Studio and the SAM backend run in Docker containers. The environment uses the ViT-H version of SAM rather than MobileSAM or SAM 2.
Prerequisites and Source Repositories
This procedure was checked on Ubuntu 24.04. The versions used for that check are listed below.
| Component | Version used |
|---|---|
| Docker Engine | 29.7.1 |
| Docker Compose | 5.3.1 |
| NVIDIA driver | 580.173.02 |
CUDA version reported by nvidia-smi | 13.0 |
| NVIDIA Container Toolkit | 1.19.1-1 |
This procedure uses the following repositories, which include changes for this operating environment:
These repositories are modified versions of HumanSignal Label Studio and HumanSignal Label Studio ML Backend. This guide uses the current contents of the two repositories.
Check Docker
Install Docker Engine and the Compose plugin using the official Docker instructions, then check both commands:
docker --version
docker compose version
Check the GPU
Confirm that Ubuntu can see the NVIDIA GPU and that NVIDIA Container Toolkit is installed:
nvidia-smi
dpkg -l | grep nvidia-container-toolkit
If the toolkit is not installed or configured for Docker, follow the NVIDIA Container Toolkit installation guide.
It is also useful to verify GPU access from a container before building SAM:
docker run --rm --gpus all nvidia/cuda:13.0.2-base-ubuntu24.04 nvidia-smiThe GPU name should appear in the container output.
Create Users and Groups
This environment separates the user who maintains the server from the user who owns the Label Studio data.
| User | Role |
|---|---|
sys-admin | Builds the server, operates Docker, and handles maintenance |
ops-admin | Owns the project data used by Label Studio |
Check that the example UIDs and GIDs are unused on the server, then create the users and groups:
sudo groupadd -g 1003 sys-admin
sudo groupadd -g 1004 ops-admin
sudo groupadd -g 1005 labelstudio

sudo adduser --uid 1003 --gid 1003 sys-admin
sudo usermod -aG sudo,docker,labelstudio sys-admin

sudo adduser --uid 1004 --gid 1004 ops-admin
sudo usermod -aG labelstudio ops-admin

sudo -iu sys-admin
This setup fixes the UIDs and GIDs to match the container users defined in the repository. If the same IDs are already in use on the server, do not continue without also adjusting the repository settings. Only sys-admin, which operates Docker, is added to the docker group; ops-admin is not.
Install Label Studio
Create the Docker Network
Check whether the shared network already exists:
docker network inspect label-studioIf Docker reports that it does not exist, create it:
docker network create label-studioClone the Label Studio Repository
Clone the Label Studio repository under /opt:
cd /opt
sudo git clone https://github.com/Lot4Fun/label-studio.git
Prepare the Data Directory
Create the persistent data directory before the first startup:
sudo mkdir -p /opt/label-studio/mydata/local_storage
sudo chown -R ops-admin:labelstudio /opt/label-studio/mydata
sudo chmod -R 775 /opt/label-studio/mydata
Start Label Studio
Build and start the service:
cd /opt/label-studio
docker compose -f compose.yaml up -d --buildOpen http://SERVER_IP:8080 in a browser. If the Label Studio screen appears, create the initial account.
Obtain a Label Studio Access Token
The SAM backend needs a token to retrieve images from Label Studio. This integration uses a Legacy Token.
- Open Organization > Access Token Settings.
- Enable Legacy Tokens.
- Open Account & Settings > Legacy Token.
- Copy the token.
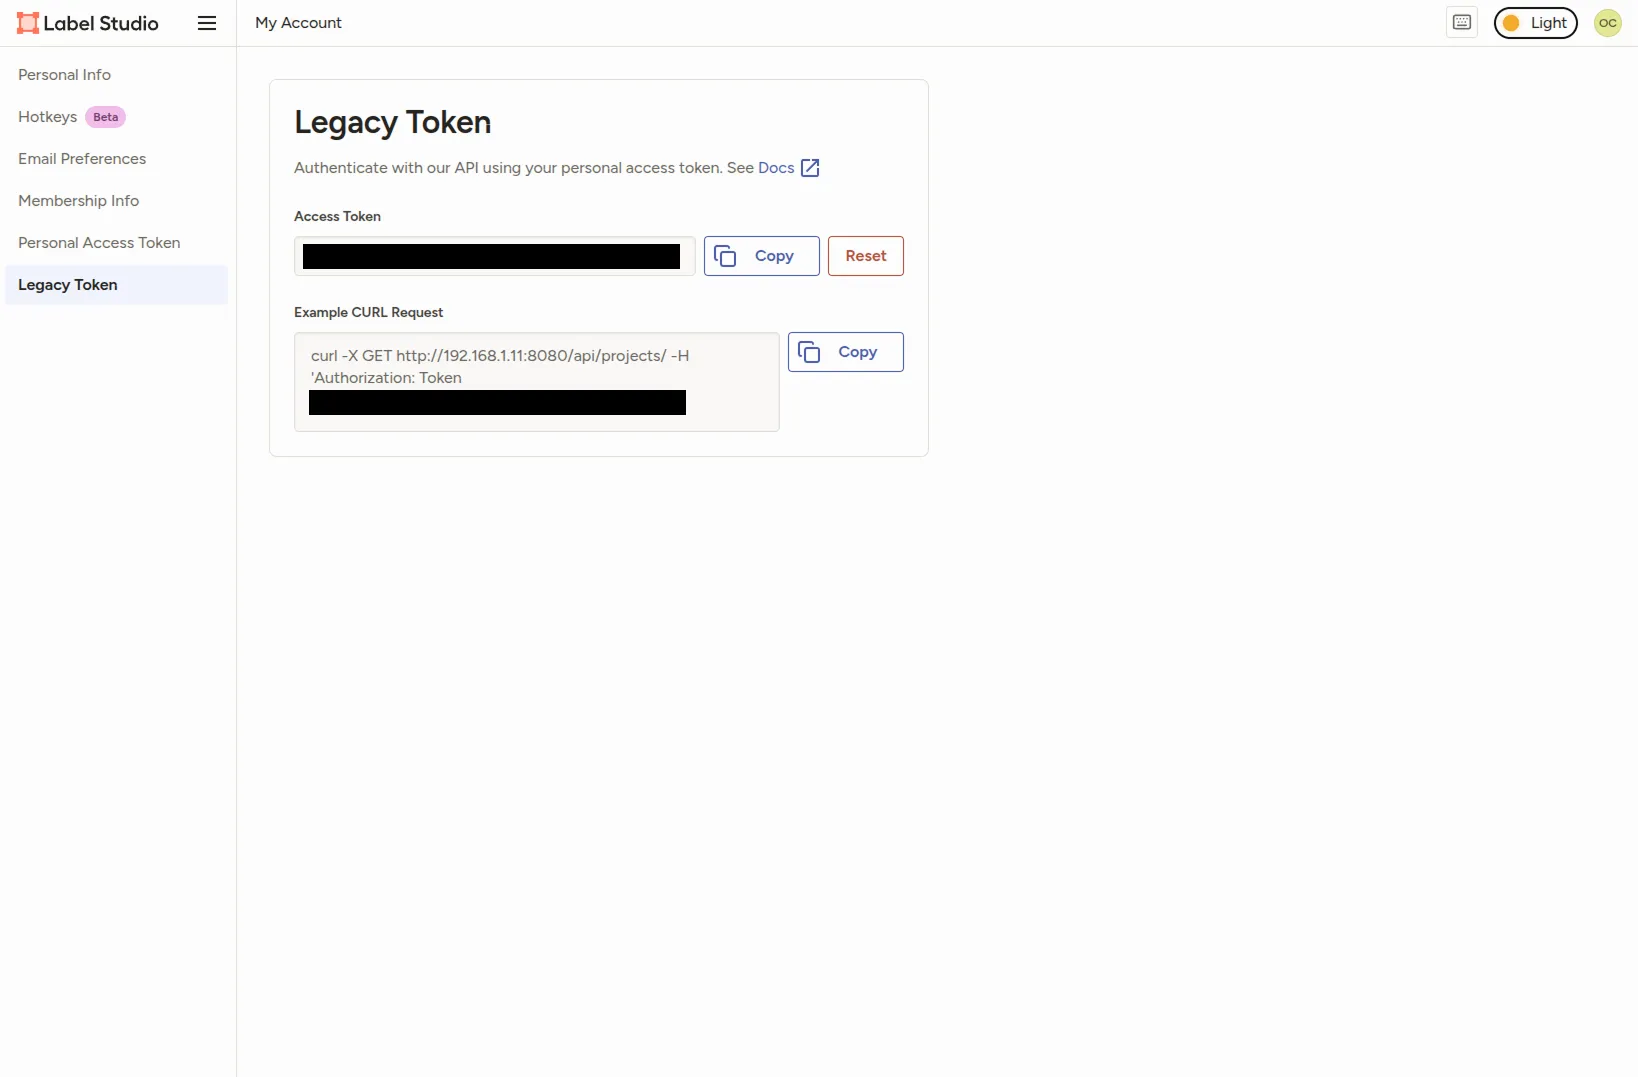
Legacy Tokens do not expire automatically, so revoke a token that is no longer needed.
Install the SAM Backend
Clone the SAM Backend Repository
Clone the SAM backend repository:
cd /opt
sudo git clone https://github.com/Lot4Fun/label-studio-ml-backend.git
Set the Label Studio Access Token
Open the SAM backend Compose file:
sudo vi /opt/label-studio-ml-backend/label_studio_ml/examples/segment_anything_model/docker-compose.ymlReplace the access-token value with the Legacy Token obtained from Label Studio:
environment:
  ...
  - LABEL_STUDIO_ACCESS_TOKEN={YOUR_ACCESS_TOKEN}
Do not commit or publish the Compose file while it contains the real token.
Start the SAM Backend
Build and start the SAM backend:
cd /opt/label-studio-ml-backend/label_studio_ml/examples/segment_anything_model
docker compose up -d --build
After startup, check that the SAM backend responds:
curl http://localhost:9090/The SAM backend is ready when it returns:
{"model_class":"SamMLBackend","status":"UP"}Create an Annotation Project
Create a project in Label Studio, select Custom Template, and paste the following labeling configuration:
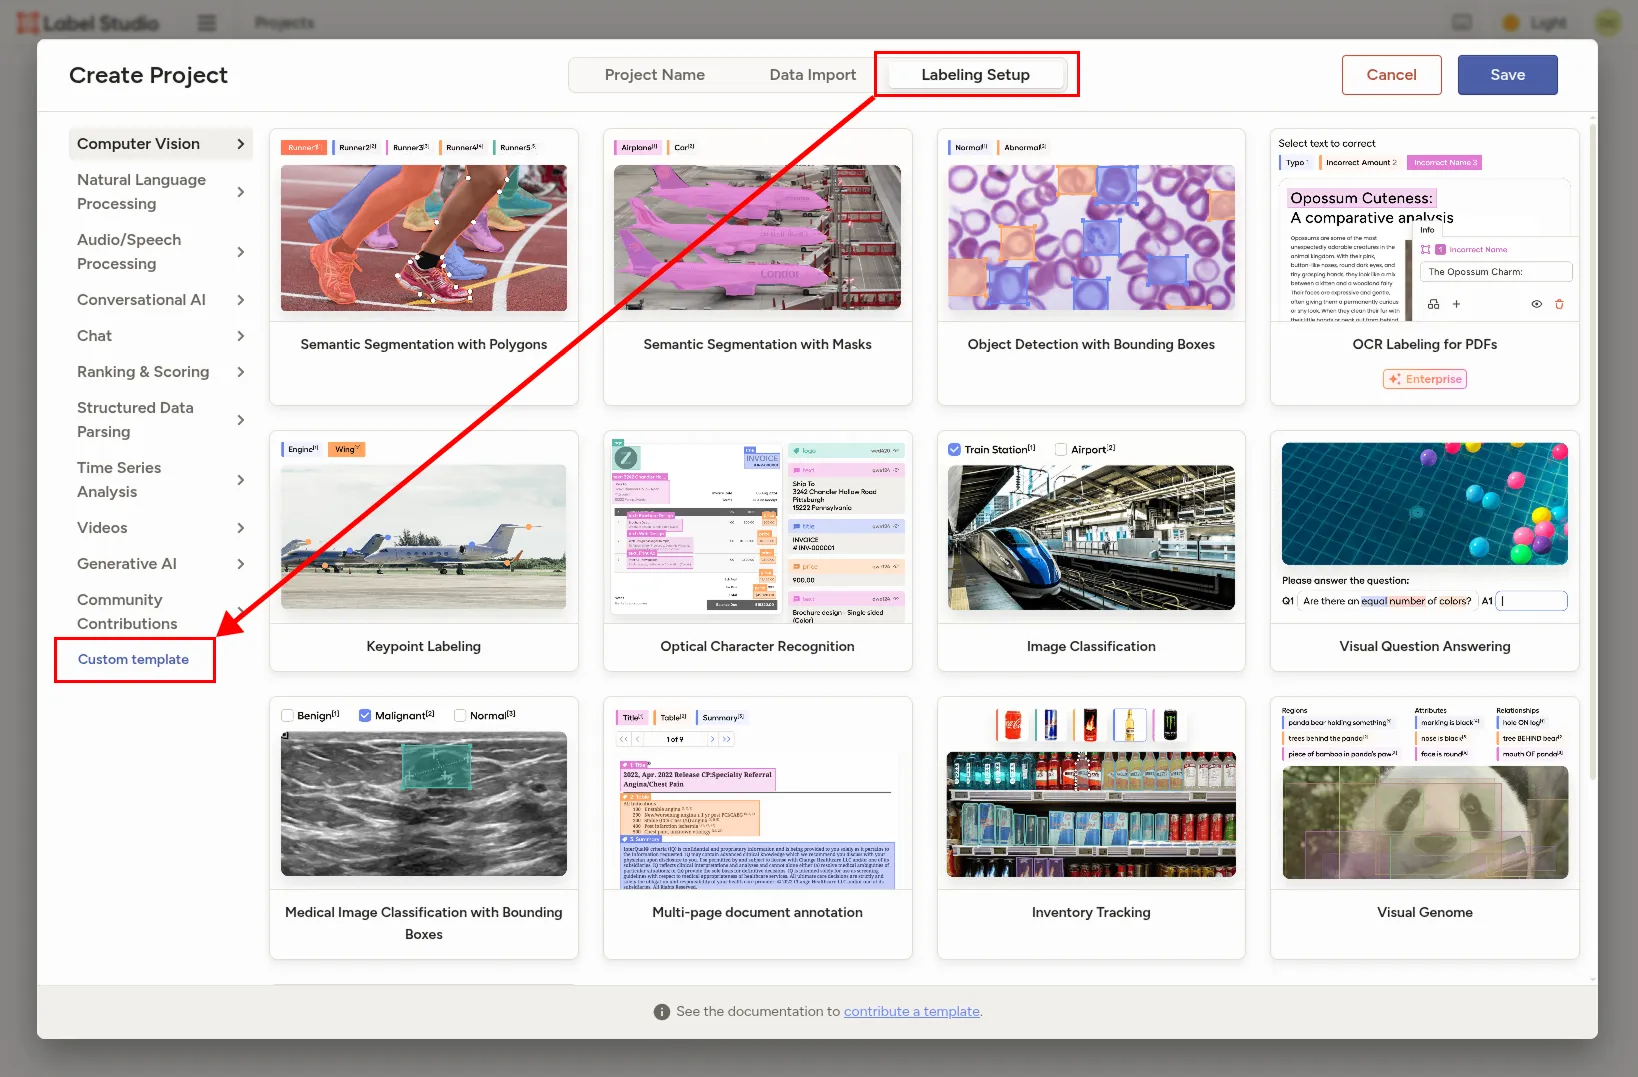
<View>
  <Image name="image" value="$image" zoom="true" zoomControl="true"/>
  <Header value="Segmentation Mask"/>
  <BrushLabels name="brush_labels" toName="image">
    <Label value="Fish" background="#E64A45"/>
  </BrushLabels>
  <Header value="SAM Prompt"/>
  <RectangleLabels name="rectangle_labels" toName="image" smart="true">
    <Label value="Fish" background="#1E3A5F" showInline="true"/>
  </RectangleLabels>
</View>
Connect SAM to the Project
Open Settings > Model > Connect Model and add a connection with these values:
| Field | Value |
|---|---|
| Name | Original SAM ViT-H GPU (any name) |
| Backend URL | http://segment_anything_model:9090 |
| Authentication | No Authentication |
| Interactive preannotations | Enabled |
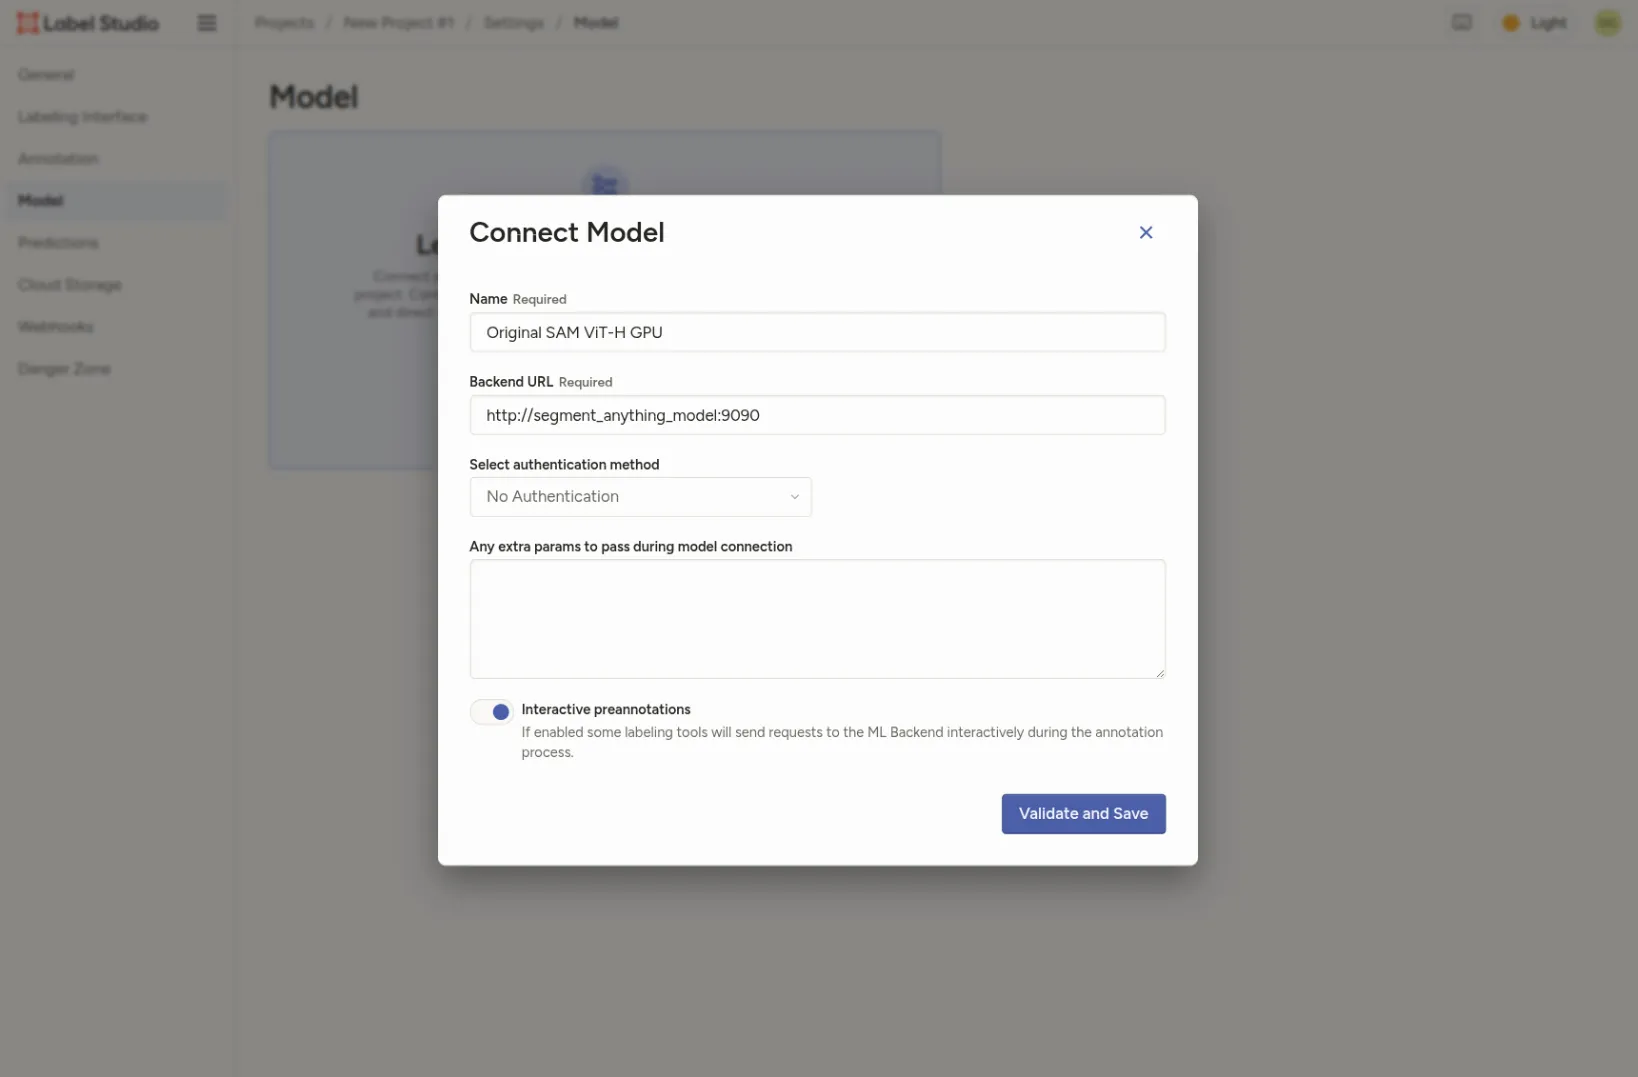
The SAM backend uses No Authentication, so do not expose it to the internet.
Try Annotation with SAM
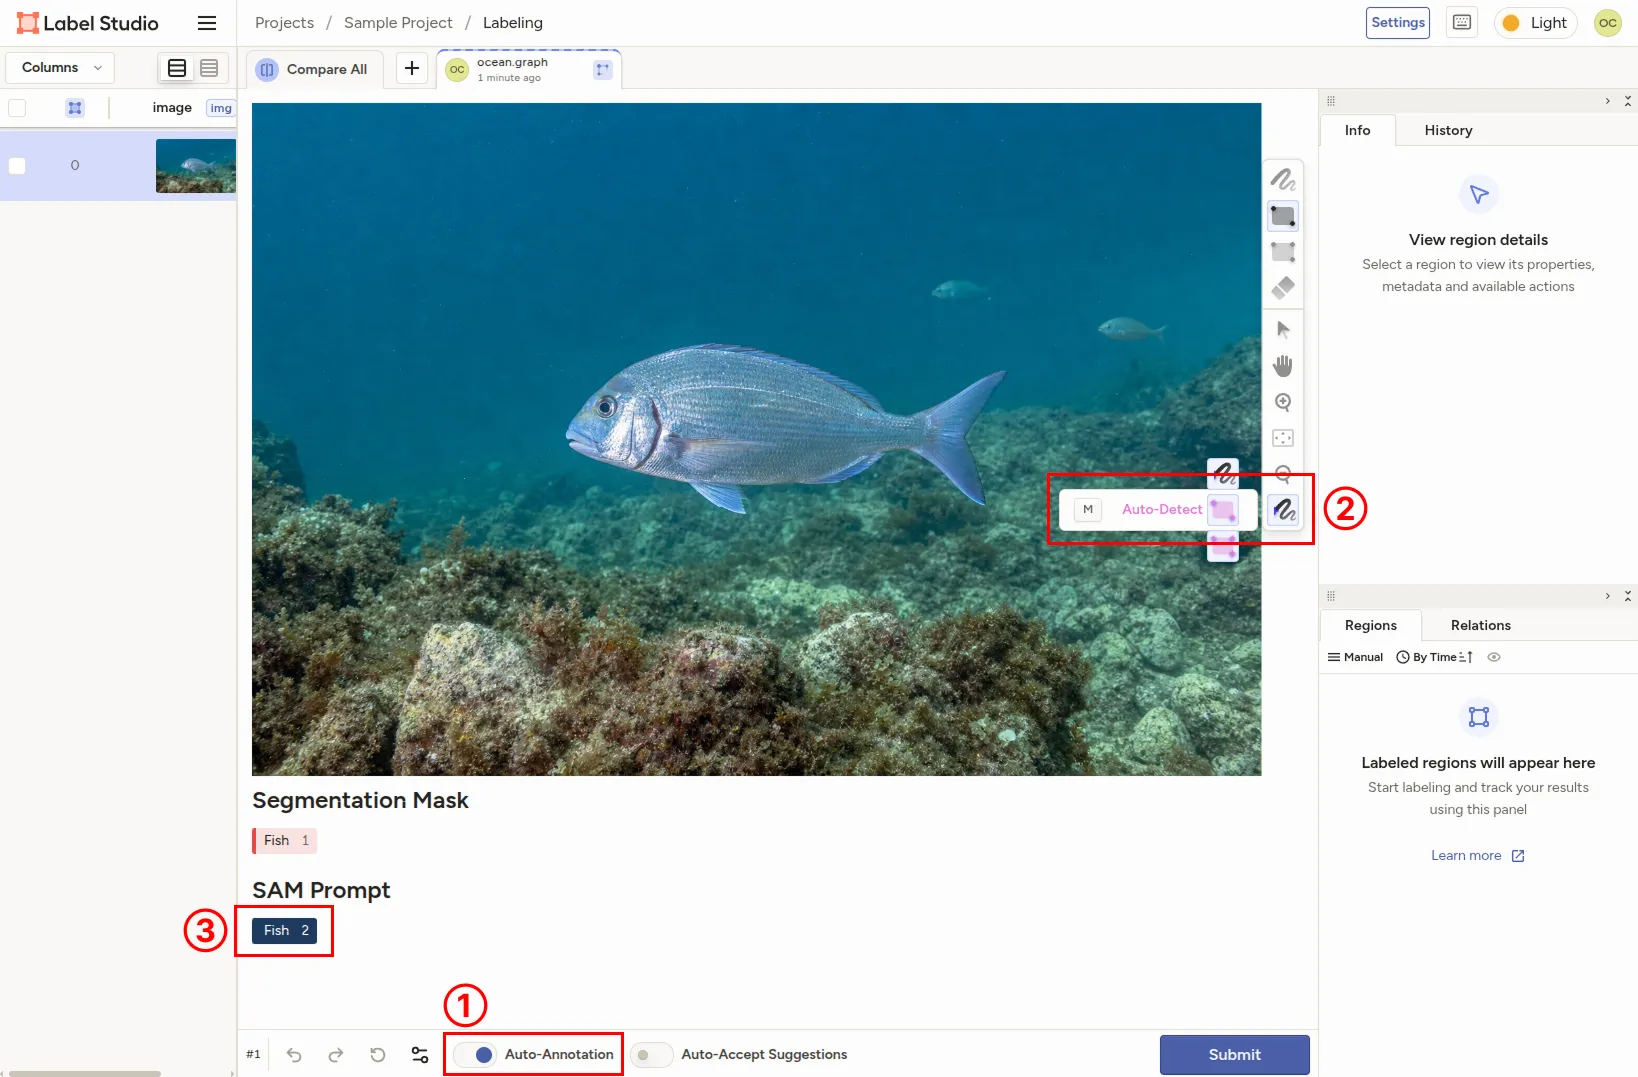
Import the image and open it in the labeling screen:
- Enable Auto-Annotation.
- Select the smart rectangle tool.
- Select the
Fishlabel. - Draw a box around one fish.
- Wait for the brush mask to appear.
- Submit the annotation.
Decide the Annotation Rules Before Scaling Up
Before annotating a large dataset, test the workflow on a small set of representative images. Write down how annotators should handle cases such as:
- Targets that are partly outside the image
- Overlapping or partly hidden targets
- Transparent fins, motion blur, turbidity, and unclear boundaries
- Images that should be excluded
- Review by a second person or spot-checking
If completing the annotation work within your own organization would be difficult, outsourcing is another option. The inquiry link below can also be used to ask about setup and implementation support.
Common Problems
If the SAM backend cannot use the GPU, check nvidia-smi on the host, repeat it in the CUDA container, and then run the PyTorch CUDA check in the SAM backend container.
If the model connects but no mask appears, confirm that Interactive preannotations and Auto-Annotation are enabled, the Legacy Token is valid, and both XML label values are Fish. Check the SAM backend logs with docker compose logs segment_anything_model.
If Label Studio cannot write its data, compare the ownership of /opt/label-studio/mydata with the UID and GID used by the custom image. Do not use chmod 777 as a permanent workaround.
Contact
Implementation support and annotation services
Ask about setup, design, and implementation support, or annotation services.
Before Using the Environment in Production
This setup is intended for evaluation or use on a controlled research network. It should not be exposed directly to the public internet without reviewing access control, HTTPS, database authentication, backups, secret management, and the Label Studio security guidance.
Related Guides and Official References
Continue with:
- How to Make a Research Analysis Reproducible with Docker
- How to Keep Research Code Reproducible with Git and GitHub
- Ocean Data Visualization: Methods, Examples, and Tools
- Data Leakage in Marine Machine Learning: Spatial and Temporal Splits Explained
- From Marine Image Annotations to a Segmentation Model: Training and Evaluation
- Human-in-the-Loop for Marine AI: Reviewing Predictions and Improving Training Data
References: